Ever seen
$ eye load myconfig.eye
Killed
If so, solution is quite simple. Run rm ~/.eye -rf and remove eye folder. Then re-run eye load and it should all work :)
Ever seen
$ eye load myconfig.eye Killed
If so, solution is quite simple. Run rm ~/.eye -rf and remove eye folder. Then re-run eye load and it should all work :)
First of all, setup your AWS account – and login into AWS Management Console. Then create any bucket you want.
Next step is to add new IAM user – go to https://console.aws.amazon.com/iam/home?#users, select Users and click Create new user button.
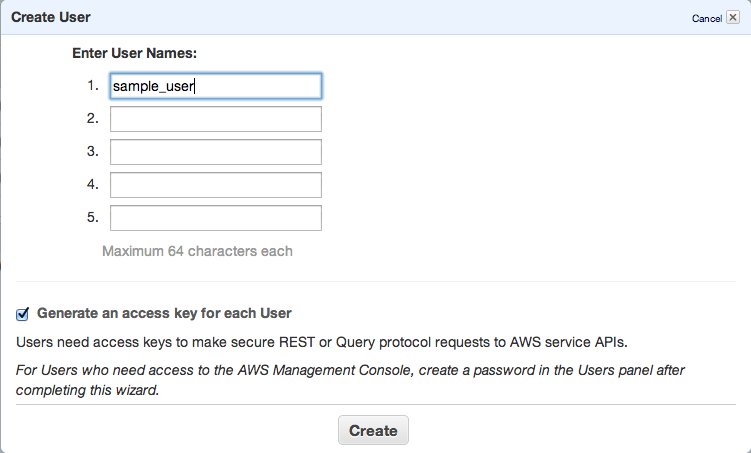
Click Create and copy/paste or download your access keys.
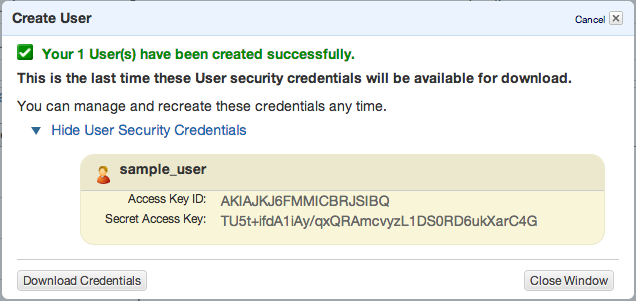
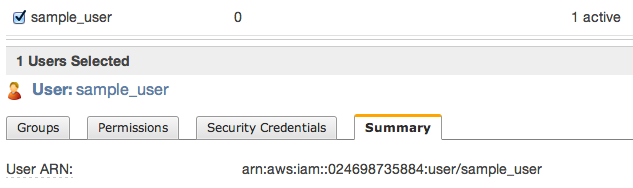
Then close window and click to summary tab – you’ll need to copy ARN notation of this user
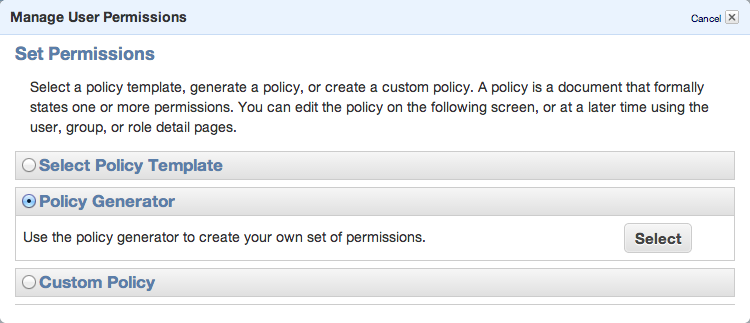
To be able to sync some folders and/or use s3cmd commandline tool, you need to setup some more policies. Click Permission tab and then Attach User Policy. Then choose Policy Generator and follow these steps:
 Set permissions as shown in following image – we need ListAllMyBuckets for :::* and ListBucket and PutObject for the one, specified bucket.
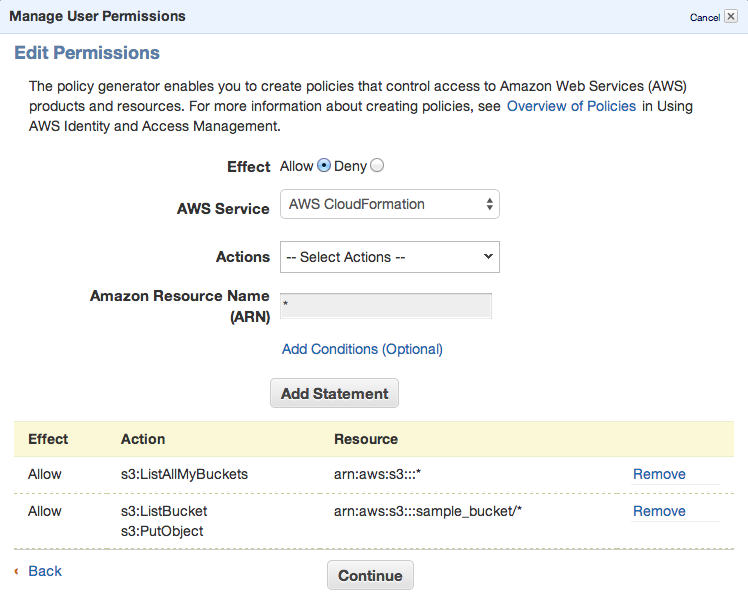
Click Continue and save new policy
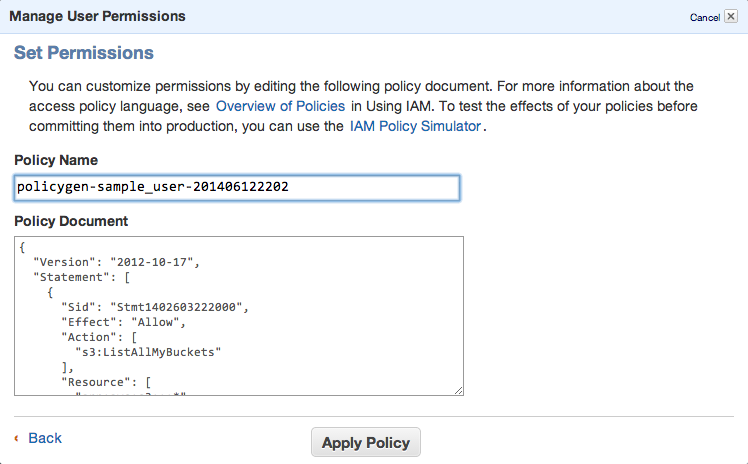
You can always edit the policy using Manage Policy. You should create this kind of policy file:
{
  "Version": "2012-10-17",
  "Statement": [
    {
      "Sid": "Stmt1402603222000",
      "Effect": "Allow",
      "Action": [
        "s3:ListAllMyBuckets"
      ],
      "Resource": [
        "arn:aws:s3:::*"
      ]
    },
    {
      "Sid": "Stmt1402603306000",
      "Effect": "Allow",
      "Action": [
        "s3:ListBucket",
        "s3:PutObject"
      ],
      "Resource": [
        "arn:aws:s3:::sample_bucket/*"
      ]
    }
  ]
}
That’s all. Lets move to bucket policy.
Now you can open Policy Generator – http://awspolicygen.s3.amazonaws.com/policygen.html and start adding new items.
First of all, select your policy type – S3

and then fill new policy – we need two policies – one for all users to read objects (GetObject) and second for your new user, to be able to upload, delete and get object as well.
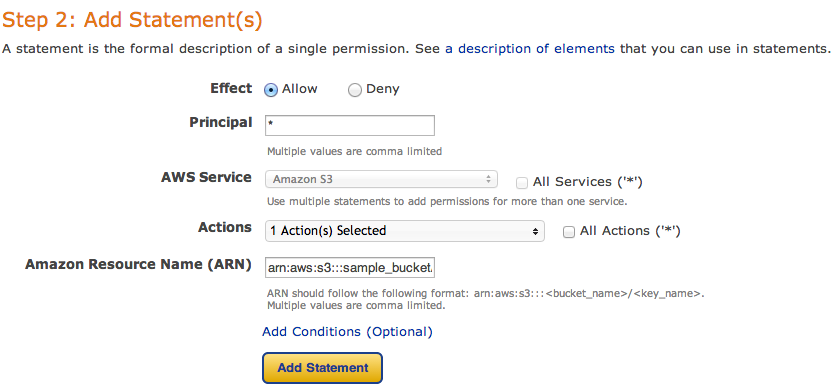
and click Add Statement. The list below the form should look like

So, add your user the same way. As principal add your ARN notation (which you copied before) and add Actions as shown below.

All set. You need to click Generate Policy button and copy freshly generated JSON policy to your clipboard
{
  "Id": "Policy1402594421281",
  "Statement": [
    {
      "Sid": "Stmt1402593998750",
      "Action": [
        "s3:GetObject"
      ],
      "Effect": "Allow",
      "Resource": "arn:aws:s3:::sample_bucket/*",
      "Principal": {
        "AWS": [
          "*"
        ]
      }
    },
    {
      "Sid": "Stmt1402594323930",
      "Action": [
        "s3:AbortMultipartUpload",
        "s3:DeleteObject",
        "s3:GetObject",
        "s3:GetObjectAcl",
        "s3:PutObject",
        "s3:PutObjectAcl"
      ],
      "Effect": "Allow",
      "Resource": "arn:aws:s3:::sample_bucket/*",
      "Principal": {
        "AWS": [
          "arn:aws:iam::024698735884:user/sample_user"
        ]
      }
    }
  ]
}
Last step is to add this policy to the bucket. Go back to your S3 console (https://console.aws.amazon.com/s3/home), click loupe icon next to bucket name and open Permission section. Click on Edit Bucket Policy and paste the generated policy into that window. Save and you’re done.

You’ll need API keys for use with Paperclip or any other S3 storage engine, so keep them safe.
PS: when you plan to use s3 as storage for your static files, avoid using underscore in your bucket name – as it does not comply with valid FQDN. ‘sample_bucket’ was used only as an example, in the real word you should use ‘sample-bucket’.
We’re currently using (for one part of our infrastructure) logging into elasticsearch. We have fluentd collectors and kibana interface for viewing and searching through the logs. 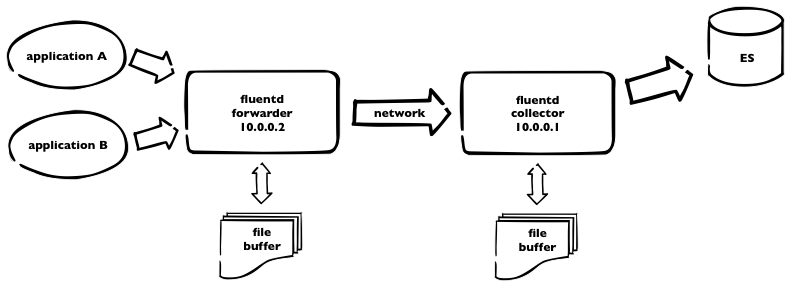 This is how it works. Logs are sent to fluentd forwarder and then over the network to fluentd collector, which pushes all the logs to elasticsearch. As we have plenty of logs, we need to incorporate some buffering – on both sides – using buffer_file statement in the fluentd config. Here is a part of our fluentd config from forwarder
<match ***>
  type forward
  send_timeout 60s
  recover_wait 10s
  heartbeat_interval 1s
  phi_threshold 16
  hard_timeout 120s

  # buffer
  buffer_type file
  buffer_path /opt/fluentd/buffer/
  buffer_chunk_limit 8m
  buffer_queue_limit 4096
  flush_interval 10s
  retry_wait 20s

  # log to es
  <server>
    host 10.0.0.1
  </server>
  <secondary>
    type file
    path /opt/fluentd/failed/
  </secondary>
</match>
and the same for the collector
<source>
  type forward
  bind 10.0.0.1
</source>

<match log.**>
  type elasticsearch
  logstash_format true
  # elastic host
  host 10.0.0.3
  port 9200
  logstash_prefix log
  include_tag_key

  # buffering
  buffer_type file
  buffer_path /opt/fluentd/buffer/
  flush_interval 5m
  buffer_chunk_limit 16m
  buffer_queue_limit 4096
  retry_wait 15s
</match>
So. For the forwarder, we’re using buffer with max 4096 8MB chunks = 32GB of buffer space. Forwarder is flushing every 10secs. For collector, we use bigger chunks, as elasticsearch is capable to handle it – but not using default 256MB chunks due to memory limitations. Flushing period is longer – and should be – recommended value is 5minutes. We can keep up to 64Gigs of buffer data.
What happens if one of the fluentd dies. Some data will be probably lost, when unsaved to buffer. But. When there’s connection lost or collector fluentd isn’t running, all logs, collected by forwarder, are stored into the buffer – and sent later. Which is great. The same when ES is down for some reason, collector node is still receiving data and is able to continue sending into ES after full recovery.
PS: don’t forget to make some tweaks to the system itself, like raise the limit for max files opened and some tcp tunning.
I need to setup deploy task to run eye. Tried to deal with gem-wrappers, but had no success. As capistrano3 is using non-interactive ssh, without loading user’s environment (.profile, .bashrc etc), then command, which is not in PATH, it’s not workin.
So, after searching and reading capistrano (capistrano/rvm) source, then sshkit source, I got into this simple solution.
It’s not dependent on any other settings nor knowing what, where rvm is installed.
before change in deploy.rb (not working)
 INFO [57a66442] Running /usr/bin/env eye info on example.com
DEBUG [46484690] Command: cd /home/deploy/app/releases/20140130214109 && ( /usr/bin/env eye info )
DEBUG [46484690] 	/usr/bin/env: eye
DEBUG [46484690] 	: No such file or directory
after change in deploy.rb
INFO [a2f9c75f] Running /usr/local/rvm/bin/rvm default do eye info on example.com
set :rvm_remap_bins, %w{eye}

namespace :settings do
  task :prefix_rake do
    fetch(:rvm_remap_bins).each do |cmd|
      SSHKit.config.command_map[cmd.to_sym] = "#{SSHKit.config.command_map[:gem].gsub(/gem$/,'')} #{cmd}"
    end
  end
end

after 'rvm:hook', 'settings:prefix_rake'
original code from capistrano is
# https://github.com/capistrano/rvm/blob/master/lib/capistrano/tasks/rvm.rake
SSHKit.config.command_map[:rvm] = "#{fetch(:rvm_path)}/bin/rvm"

rvm_prefix = "#{fetch(:rvm_path)}/bin/rvm #{fetch(:rvm_ruby_version)} do"
fetch(:rvm_map_bins).each do |command|
  SSHKit.config.command_map.prefix[command.to_sym].unshift(rvm_prefix)
end

...
set :rvm_map_bins, %w{gem rake ruby bundle}
In the last article I introduced how to install and use redis sentinel. As I’m using ruby, I need to use this new redis configuration with ruby (on rails).
For ruby on rails use redis-sentinel gem.
Then your redis initializer will look like
sentinels = [
  { host: '10.0.0.1', port: 17700 },
  { host: '10.0.0.2', port: 17700 },
  { host: '10.0.0.3', port: 17700 },
  { host: '10.0.0.4', port: 17700 }
]
# redis master name from sentinel.conf is 'master'
Redis.current = Redis.new(master_name: 'master', sentinels: sentinels)
You can use your redis then as usual.
When using sidekiq, configuration is pretty simple too
require 'sidekiq/web'
require 'redis-sentinel'
require 'sidetiq/web'

rails_root = ENV['RAILS_ROOT'] || File.dirname(__FILE__) + '/../..'
rails_env = ENV['RAILS_ENV'] || 'development'

sentinels = [
  { host: '10.0.0.1', port: 17700 },
  { host: '10.0.0.2', port: 17700 },
  { host: '10.0.0.3', port: 17700 },
  { host: '10.0.0.4', port: 17700 }
]

redis_conn = proc {
  Redis.current = Redis.new(master_name: 'master', sentinels: sentinels)
}
redis = ConnectionPool.new(size: 10, &redis_conn)

Sidekiq.configure_server do |config|
  config.redis = redis
end

Sidekiq.configure_client do |config|
  config.redis = redis
end
You can test your configuration. Run rails console and test with
Loading production environment (Rails 3.2.16)
1.9.3p448 :001 > Redis.current.keys("*").count
 => 746
1.9.3p448 :002 > Redis.current
 => #<Redis client v3.0.5 for redis://10.0.0.2:6379/0>
if you see “127.0.0.1:6379”, something is probably wrong. Then try to set/get some key and check Redis.current once again.
I need to add maintenance page to some rails app, running with passenger and nginx. Here’s some config and steps.
You just need to add static html file to app_root/public/maintenance.html – and I assume css files on /assets url.
so, here’s nginx config:
server {
  listen 80;
  server_name = www.example.com;
  root /home/deploy/www.example.com/public;
  passenger_enabled on;
  passenger_min_instances 5;

  set $maintenance 0;

  # is there maintenance file set?
  if (-f $document_root/../tmp/maintenance.txt) {
    set $maintenance 1;
  }

  # exclude /assets
  if ( $uri ~* ^/assets\/\.* ) {
    set $maintenance 0;
  }

  # in maintenance mode - send 503 status
  if ($maintenance = 1) {
    return 503;
  }

  # maintenance mode
  error_page 503 @503;

  # rewrite everything to maintenance.html
  location @503 {
    rewrite ^ /maintenance.html last;
    break;
  }
}
setting maintance mode is really simple – set app_root/tmp/maintenance.txt file – when escaping, just remove that file.
I needed to change image in my UIImageView, but simply setting new image using myImageView.setImage didn’t work. There’s simple workaround
@button = UIView.alloc.initWithFrame(frame)
buttonImage = UIImageView.alloc.initWithFrame(@button.bounds)
buttonImage.setTag(1) # set any number you want
buttonImage.autoresizingMask = UIViewAutoresizingFlexibleWidth | UIViewAutoresizingFlexibleHeight
@button.addSubview buttonImage
and now set the image
self.button.viewWithTag(1).setImage(UIImage.imageNamed('answer_bar_white.png').resizableImageWithCapInsets(UIEdgeInsetsMake(18, 18, 18, 18)))
you can remove resizableImageWithCapInsets – I’m using square images to make UIImageView of any size.
just use
y caller
I’ve needed to print simple table as
1  2  3  5  7
2  4  6 10 14
3  6  9 15 21
5 10 15 25 35
7 14 21 35 49
as you can see, x = y, cell in table = x*y (x*x to be exact)
primes = [2, 3, 5, 7]
primes = [1] + primes # we need that to print x/y axis
puts primes.map{|i| primes.map{|a| a*i}}.map{|i| ['%4i']*primes.length*' '%i}
Tried simple Sieve of Eratosthenes in Ruby …
class MyPrime

  attr_reader :primes # there we can read then

  # compute prime numbers up to limit, default is 20
  def initialize(limit = 20)
    @primes = []
    limit = limit.to_i
    return if limit.to_i < 2
    arr = Hash[*((2..limit).to_a*2).sort] # we can use .zip too
    (2..Math.sqrt(limit)).each do |i|
      next unless arr[i] # already removed
      (i*i..limit).step(i).each{|k| arr.delete(k)}
    end
    @primes = arr.keys.sort # return just keys
  end
end
we can add some tests
require 'test/unit'
require 'my_prime'

class TestMyPrime < Test::Unit::TestCase

  def test_20_primes
    primes = MyPrime.new(20)
    assert_equal [2, 3, 5, 7, 11, 13, 17, 19], primes.primes
  end

  def test_wo_param
    primes = MyPrime.new
    assert_equal [2, 3, 5, 7, 11, 13, 17, 19], primes.primes
  end

  def test_less_than_2
    primes = MyPrime.new(1)
    assert_equal [], primes.primes
  end

  def test_limit_eq_2
    primes = MyPrime.new(2)
    assert_equal [2], primes.primes
  end

  def test_limit_is_string
    primes = MyPrime.new('20')
    assert_equal [2, 3, 5, 7, 11, 13, 17, 19], primes.primes
  end

  def test_limit_is_float
    primes = MyPrime.new(20.50)
    assert_equal [2, 3, 5, 7, 11, 13, 17, 19], primes.primes
  end

end