#!/bin/bash

declare -A USE_MAP
declare -a ENABLES

# export_name dependency dependecy dependency...
USE_MAP['HBASE']='USE_HBASE HCATALOG HUE'
USE_MAP['PIG']='USE_PIG'
USE_MAP['HUE']='USE_HUE'
USE_MAP['HCATALOG']='USE_HCATALOG'
USE_MAP['PRESTO']='USE_PRESTO HCATALOG'
ENABLES=()

function use() {
  local dep=(${USE_MAP["$1"]})
  ENABLES+=(${dep[0]})
  dep=("${dep[@]:1}")
  if [ ! -z "$dep" ]; then
    for item in ${dep[@]}; do
      use $item
    done
  fi
}

function export_enabled() {
  sorted_use=($(echo "${ENABLES[@]}" | tr ' ' '\n' | sort -u | tr '\n' ' '))
  for item in ${sorted_use[@]}; do
    echo "export $item";
  done
}

use HBASE
export_enabled

------

$ bash resolve.sh
export USE_HBASE
export USE_HCATALOG
export USE_HUECategory: programming
R – Četnost podruhé
Mějme následující data:
> head(dotaznik.csv[,c(2,3)])
  type gender
1    H      F
2    H      M
3    A      F
4    A      M
5    A      F
6    H      M
A potřebujeme zjistit absolutní a relativní četnost výskytu žen a mužů, rozdělenou ještě podle hodnoty v type .
> tbl <- table(dotaznik.csv$gender, dotaznik.csv$type)
> tbl

     A  H
  M 18 16
  Ž 17 19
Opět převedeme na data frame
> tbl.frame <- as.data.frame(tbl)
> tbl.frame
  Var1 Var2 Freq
1    M    A   18
2    Ž    A   17
3    M    H   16
4    Ž    H   19
A máme absolutní četnost. Teď vypočítáme relativní četnost.
> library(plyr)
> ddply(tbl.frame, .(Var2), transform, prop=Freq/sum(Freq))
  Var1 Var2 Freq      prop
1    M    A   18 0.5142857
2    Ž    A   17 0.4857143
3    M    H   16 0.4571429
4    Ž    H   19 0.5428571
Což znamená: pro každý subset z framu tbl.frame , rozdělený podle proměnné Var2 , proveď transform , a vypočti relativní četnost podle frekvence (abs. četnosti) a součtu hodnot frekvence.
R – četnost a graf
Dostal jsem pověření z nejvyšších míst vyrobit statistické zhodnocení dotazníků. A protože bytostně nemám rád Excel, našel jsem R a zkouším.
Udělal jsem data do CSV souboru a nahrál do R (RStudio)
> head(dotaznik.csv)
  num type gender age height weight           edu
1   1    H      M  60    182    100 Vysokoškolské
2   2    H      M  49    188    102      Vyučen/a
3   3    H      M  61    176     75      Vyučen/a
4   4    H      M  56    180    110       Střední
5   5    H      M  47    180     95 Vysokoškolské
6   6    H      M  48    178     95       Střední
Zkusíme vyrobit četnost vzdělání (edu) a potom ji ještě rozdělit podle pohlaví (gender).
> edu <- table(dotaznik.csv$edu)
> edu

      Střední Vysokoškolské Vyšší odborné      Vyučen/a
           30             7             2            25
     Základní
            6
Máme tabulku, ale potřebujeme z ní frame
> fedu <- as.data.frame(edu)
> fedu
           Var1 Freq
1       Střední   30
2 Vysokoškolské    7
3 Vyšší odborné    2
4      Vyučen/a   25
5      Základní    6
Přidáme relativní četnost (mean)
> fedu$mean <- fedu$Freq / sum(fedu$Freq)
> fedu
           Var1 Freq       mean
1       Střední   30 0.42857143
2 Vysokoškolské    7 0.10000000
3 Vyšší odborné    2 0.02857143
4      Vyučen/a   25 0.35714286
5      Základní    6 0.08571429
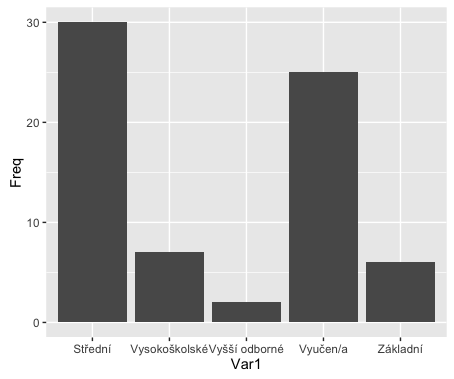
A teď na graf. Používáme ggplot2.
ggplot(fedu, aes(x=Var1, y=Freq)) + geom_bar(stat='identity')
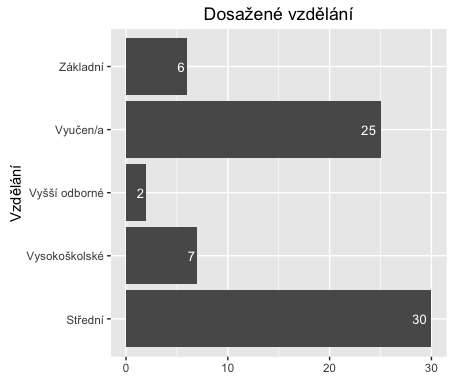
Fajn. Ale chceme graf otočit
ggplot(fedu, aes(x=Var1, y=Freq)) + geom_bar(stat='identity') + coord_flip()

Teď ještě smazat popisek osy x a přepsat osu y.
ggplot(fedu, aes(x=Var1, y=Freq)) + geom_bar(stat='identity') +
coord_flip() +
xlab('Vzdělání') +
theme(axis.title.x = element_blank()) +
ggtitle('Dosažené vzdělání')

A finálně přidáme hodnoty frekvence do jednotlivých sloupců.
ggplot(fedu, aes(x=Var1, y=Freq)) +
geom_bar(stat='identity', position=position_dodge()) +
geom_text(aes(label=Freq), hjust=1.3, color="white",position = position_dodge(0.9), size=3.5) +
coord_flip() +
xlab('Vzdělání') +
theme(axis.title.x = element_blank()) +
ggtitle('Dosažené vzdělání')
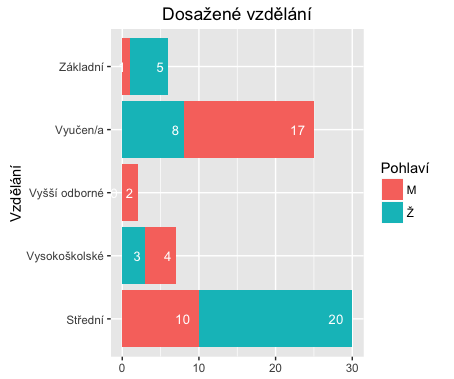
A teď trochu komplexněji. Ještě to rozdělíme na muže a ženy..
> edu <- table(dotaznik.csv$gender, dotaznik.csv$edu)
> edu

    Střední Vysokoškolské Vyšší odborné Vyučen/a Základní
  M      10             4             2       17        1
  Ž      20             3             0        8        5

> fedu <- as.data.frame(edu)
> fedu
   Var1          Var2 Freq
1     M       Střední   10
2     Ž       Střední   20
3     M Vysokoškolské    4
4     Ž Vysokoškolské    3
5     M Vyšší odborné    2
6     Ž Vyšší odborné    0
7     M      Vyučen/a   17
8     Ž      Vyučen/a    8
9     M      Základní    1
10    Ž      Základní    5
a přidáme graf
> ggplot(fedu, aes(x=Var2, y=Freq, fill=Var1)) +
geom_bar(stat='identity', position=position_dodge()) +
geom_text(aes(label=Freq), hjust=1.6, color="white",position = position_dodge(0.9), size=3.5) +
coord_flip() +
xlab('Vzdělání') +
theme(axis.title.x = element_blank()) +
ggtitle('Dosažené vzdělání') +
labs(fill = 'Pohlaví')

A co když budeme chtít jeden bar, ale rozdělený podle hodnot?
# seridime podle Var2 a Freq
> library(plyr)
> fedu_s <- arrange(fedu, Var2, Freq)
> fedu_s
   Var1          Var2 Freq
1     M       Střední   10
2     Ž       Střední   20
3     Ž Vysokoškolské    3
4     M Vysokoškolské    4
5     Ž Vyšší odborné    0
6     M Vyšší odborné    2
7     Ž      Vyučen/a    8
8     M      Vyučen/a   17
9     M      Základní    1
10    Ž      Základní    5

# a pridame souhrnny soucet, rozdeleny s kazdym jinym Var2
> fedu_s_sum <- ddply(fedu_s, 'Var2', transform, label_ypos=cumsum(Freq))
> fedu_s_sum
   Var1          Var2 Freq label_ypos
1     M       Střední   10         10
2     Ž       Střední   20         30
3     Ž Vysokoškolské    3          3
4     M Vysokoškolské    4          7
5     Ž Vyšší odborné    0          0
6     M Vyšší odborné    2          2
7     Ž      Vyučen/a    8          8
8     M      Vyučen/a   17         25
9     M      Základní    1          1
10    Ž      Základní    5          6
A graf
ggplot(fedu_s_sum, aes(x=Var2, y=Freq, fill=Var1)) +
geom_bar(stat='identity') +
geom_text(aes(label=Freq, y=label_ypos), hjust=1.6, color="white", size=3.5) +
coord_flip() +
xlab('Vzdělání') +
theme(axis.title.x = element_blank()) +
ggtitle('Dosažené vzdělání') +
labs(fill = 'Pohlaví')
STM32F4Discovery + eLua + OSX
I fixed few bugs when compiling elua from git on osx – clone my branch clone official repo here.
$ ./build_elua.lua board=stm32f4discovery
create .bin file
$ arm-none-eabi-objcopy -O binary elua_lua_stm32f4discovery.elf elua_lua_stm32f4discovery.bin
create openocd config file for stm32f4 board:
$ cat ~/stm32f4discovery.cfg
# stm32f4discover board
source [find interface/stlink-v2-1.cfg]
transport select hla_swd
source [find target/stm32f4x.cfg]
reset_config srst_only
and upload to the board:
$ openocd -f ~/stm32f4discovery.cfg \
   -c "init" \
   -c "reset halt" \
   -c "sleep 100" \
   -c "wait_halt 2"
   -c "echo \"--- Writing elua_lua_stm32f4discovery.bin\"" \
   -c "flash write_image erase elua_lua_stm32f4discovery.bin 0x08000000" \
   -c "sleep 100" \
   -c "echo \"--- Verifying\"" \
   -c "verify_image elua_lua_stm32f4discovery.bin 0x08000000" \
   -c "sleep 100" \
   -c "echo \"--- Done\"" \
   -c "resume" \
   -c "shutdown"

Open On-Chip Debugger 0.9.0 (2015-11-16-01:48)
Licensed under GNU GPL v2
For bug reports, read
	http://openocd.org/doc/doxygen/bugs.html
Info : The selected transport took over low-level target control. The results might differ compared to plain JTAG/SWD
adapter speed: 2000 kHz
adapter_nsrst_delay: 100
none separate
srst_only separate srst_nogate srst_open_drain connect_deassert_srst
Info : Unable to match requested speed 2000 kHz, using 1800 kHz
Info : Unable to match requested speed 2000 kHz, using 1800 kHz
Info : clock speed 1800 kHz
Info : STLINK v2 JTAG v25 API v2 SWIM v14 VID 0x0483 PID 0x374B
Info : using stlink api v2
Info : Target voltage: 2.884520
Info : stm32f4x.cpu: hardware has 6 breakpoints, 4 watchpoints
target state: halted
target halted due to debug-request, current mode: Thread
xPSR: 0x01000000 pc: 0x080063f0 msp: 0x20000c78
--- Writing elua_lua_stm32f4discovery.bin
auto erase enabled
Info : device id = 0x10076413
Info : flash size = 1024kbytes
wrote 262144 bytes from file elua_lua_stm32f4discovery.bin in 7.783807s (32.889 KiB/s)
--- Verifying
target state: halted
target halted due to breakpoint, current mode: Thread
xPSR: 0x61000000 pc: 0x2000002e msp: 0x20000c78
verified 220776 bytes in 2.229936s (96.685 KiB/s)
--- Done
shutdown command invoked
Now you can connect to the board using /dev/tty.usbmodem621, 115200/8/n/1. You should get this prompt:
eLua#
eLua# help
Shell commands:
  help   - shell help
  lua    - start a Lua session
  ls     - lists files and directories
  dir    - lists files and directories
  cat    - list the contents of a file
  type   - list the contents of a file
  recv   - receive files via XMODEM
  cp     - copy files
  mv     - move/rename files
  rm     - remove files
  ver    - show version information
  mkdir  - create directories
  exit   - exit the shell
For more information use 'help <command>'.
eLua# lua
Press CTRL+Z to exit Lua
Lua 5.1.4  Copyright (C) 1994-2011 Lua.org, PUC-Rio
> print(pd.board() .. "/" .. pd.platform() .. "/" .. pd.cpu())
STM32F4DISCOVERY/STM32F4/STM32F407VG
enjoy :)
nodemcu – simple webserver
I’ve modified and updated this source:
local SSID = "my_wifi_ssid"
local SSID_PASSWORD = "my_wifi_password"

local function http_header(conn)
  conn:send('HTTP/1.1 200 OK\n\n')
  conn:send('<!DOCTYPE HTML>\n')
  conn:send('<html>\n')
  conn:send('<head><meta  content="text/html; charset=utf-8">\n')
  conn:send('<title>ESP8266 znouza test</title></head>\n')
end

local function connect (conn, data)
   local query_data

   conn:on ("receive",
      function (cn, req_data)
         query_data = get_http_req (req_data)
         print (query_data["METHOD"] .. " " .. " " .. query_data["User-Agent"])
         http_header(cn)
         cn:send ("<body>")
         cn:send ("<h1>Hello World from ESP8266 and NodeMCU!!</h1>")
         cn:send ("</body></html>")
         -- Close the connection for the request
         cn:close ( )
      end)
end

function wait_for_wifi_conn ( )
   tmr.alarm (1, 1000, 1, function ( )
      if wifi.sta.getip ( ) == nil then
         print ("Waiting for Wifi connection")
      else
         tmr.stop (1)
         print ("ESP8266 mode is: " .. wifi.getmode ( ))
         print ("The module MAC address is: " .. wifi.sta.getmac ( ))
         print ("Config done, IP is " .. wifi.sta.getip ( ))
      end
   end)
end

-- Build and return a table of the http request data
function get_http_req (instr)
   local t = {}
   local first = nil
   local key, v, strt_ndx, end_ndx

   for str in string.gmatch (instr, "([^\n]+)") do
      -- First line in the method and path
      if (first == nil) then
         first = 1
         strt_ndx, end_ndx = string.find (str, "([^ ]+)")
         v = trim (string.sub (str, end_ndx + 2))
         key = trim (string.sub (str, strt_ndx, end_ndx))
         t["METHOD"] = key
         t["REQUEST"] = v
      else -- Process and remaining ":" fields
         strt_ndx, end_ndx = string.find (str, "([^:]+)")
         if (end_ndx ~= nil) then
            v = trim (string.sub (str, end_ndx + 2))
            key = trim (string.sub (str, strt_ndx, end_ndx))
            t[key] = v
         end
      end
   end

   return t
end

-- String trim left and right
function trim (s)
  return (s:gsub ("^%s*(.-)%s*$", "%1"))
end

-- Configure the ESP as a station (client)
wifi.setmode (wifi.STATION)
wifi.sta.config (SSID, SSID_PASSWORD,1)

-- Hang out until we get a wifi connection before the httpd server is started.
wait_for_wifi_conn ( )

-- Create the httpd server
svr = net.createServer (net.TCP, 30)

-- Server listening on port 80, call connect function if a request is received
svr:listen (80, connect)
nodemcu + el capitan
- download and install CH340g driver (check your FTDI chip)
- install CoolTerm (http://freeware.the-meiers.org/)
- install ESPlorer (http://esp8266.ru/esplorer/)
- open CoolTerm, options, choose appropriate /dev/cu.* port and connect
To flash
- download firmware
- Install esptool
git clone https://github.com/themadinventor/esptool.git
cd esptool
sudo python ./setup.py install
- upgrade firmware
$ python ./esptool.py --port=/dev/cu.wchusbserial620  write_flash  -fm=dio -fs=32m 0x00000 /tmp/nodemcu_integer_0.9.6-dev_20150704.bin

Connecting...
Erasing flash...
Took 3.92s to erase flash block
Wrote 450560 bytes at 0x00000000 in 54.1 seconds (66.6 kbit/s)...

Leaving...
eye killed?
Ever seen
$ eye load myconfig.eye
Killed
If so, solution is quite simple. Run rm ~/.eye -rf and remove eye folder. Then re-run eye load and it should all work :)
Rubymotion – new bug found
I’m using this motion-addressbook in my project. Reported http://hipbyte.myjetbrains.com/youtrack/issue/RM-630
fixed in 2.37
= RubyMotion 2.37 =
* Fixed a regression where Dispatch.once did not work correctly when it was
invoked in some points.
* Fixed a bug where the compiler would crash with an assertion message
`[BUG] Object: SubtypeUntil ...' when compiling certain Ruby files.
* Fixed a bug in the compiler when compiling for ARM64 where certain types
would still be emitted with a 32-bit architecture in mind.
* Fixed a bug in the compiler when compiling for ARM64 where certain structs
would not be properly available (such as NSDecimal).
AWS S3 IAM user policy setup for bucket
First of all, setup your AWS account – and login into AWS Management Console. Then create any bucket you want.
Next step is to add new IAM user – go to https://console.aws.amazon.com/iam/home?#users, select Users and click Create new user button.
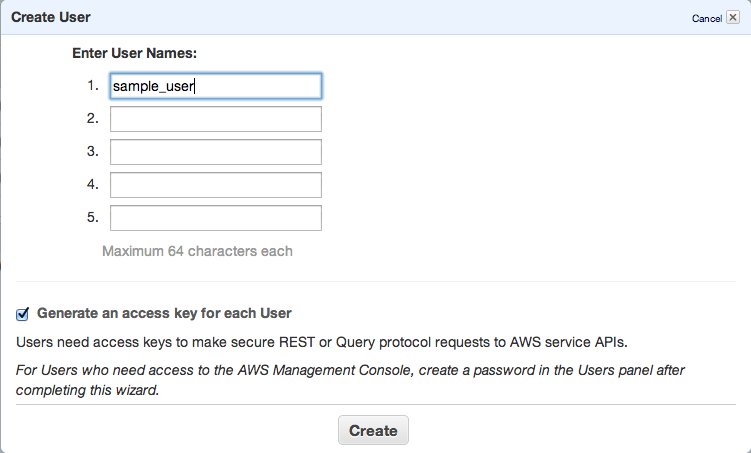
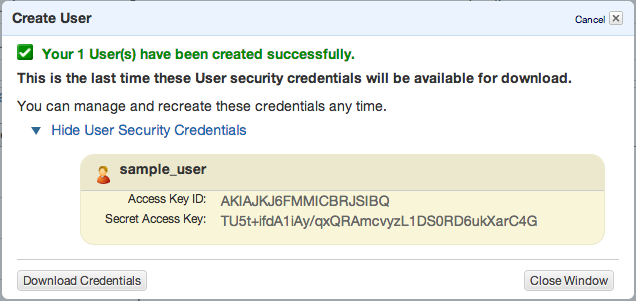
Click Create and copy/paste or download your access keys.
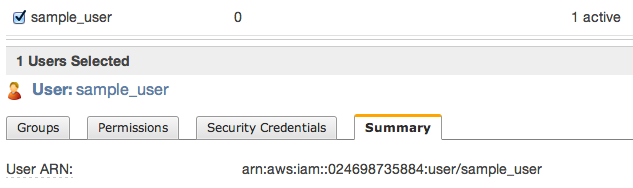
Then close window and click to summary tab – you’ll need to copy ARN notation of this user
s3cmd
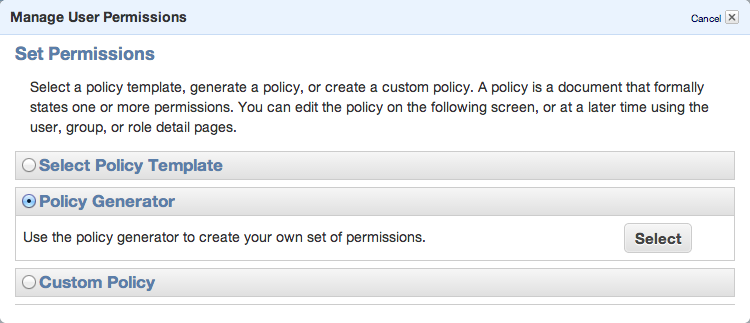
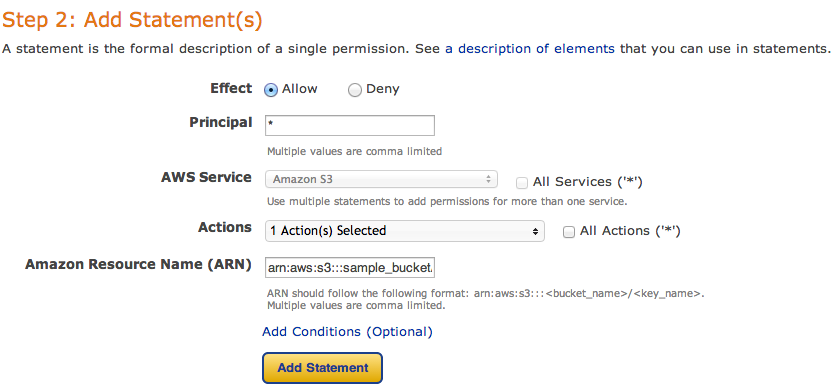
To be able to sync some folders and/or use s3cmd commandline tool, you need to setup some more policies. Click Permission tab and then Attach User Policy. Then choose Policy Generator and follow these steps:
 Set permissions as shown in following image – we need ListAllMyBuckets for :::* and ListBucket and PutObject for the one, specified bucket.
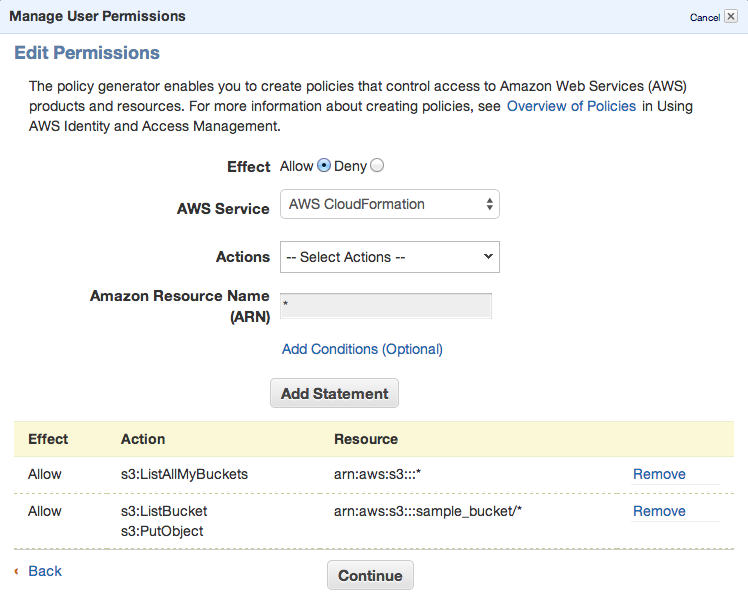
Click Continue and save new policy
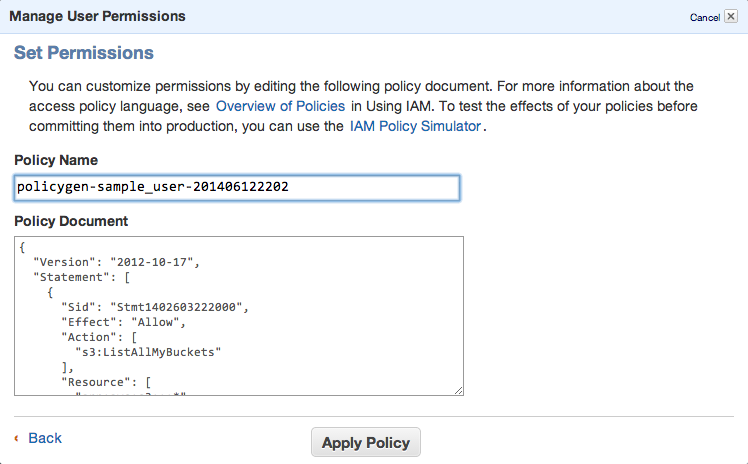
You can always edit the policy using Manage Policy. You should create this kind of policy file:
{
  "Version": "2012-10-17",
  "Statement": [
    {
      "Sid": "Stmt1402603222000",
      "Effect": "Allow",
      "Action": [
        "s3:ListAllMyBuckets"
      ],
      "Resource": [
        "arn:aws:s3:::*"
      ]
    },
    {
      "Sid": "Stmt1402603306000",
      "Effect": "Allow",
      "Action": [
        "s3:ListBucket",
        "s3:PutObject"
      ],
      "Resource": [
        "arn:aws:s3:::sample_bucket/*"
      ]
    }
  ]
}
That’s all. Lets move to bucket policy.
Bucket policy
Now you can open Policy Generator – http://awspolicygen.s3.amazonaws.com/policygen.html and start adding new items.
First of all, select your policy type – S3

and then fill new policy – we need two policies – one for all users to read objects (GetObject) and second for your new user, to be able to upload, delete and get object as well.
and click Add Statement. The list below the form should look like

So, add your user the same way. As principal add your ARN notation (which you copied before) and add Actions as shown below.

All set. You need to click Generate Policy button and copy freshly generated JSON policy to your clipboard
{
  "Id": "Policy1402594421281",
  "Statement": [
    {
      "Sid": "Stmt1402593998750",
      "Action": [
        "s3:GetObject"
      ],
      "Effect": "Allow",
      "Resource": "arn:aws:s3:::sample_bucket/*",
      "Principal": {
        "AWS": [
          "*"
        ]
      }
    },
    {
      "Sid": "Stmt1402594323930",
      "Action": [
        "s3:AbortMultipartUpload",
        "s3:DeleteObject",
        "s3:GetObject",
        "s3:GetObjectAcl",
        "s3:PutObject",
        "s3:PutObjectAcl"
      ],
      "Effect": "Allow",
      "Resource": "arn:aws:s3:::sample_bucket/*",
      "Principal": {
        "AWS": [
          "arn:aws:iam::024698735884:user/sample_user"
        ]
      }
    }
  ]
}
Last step is to add this policy to the bucket. Go back to your S3 console (https://console.aws.amazon.com/s3/home), click loupe icon next to bucket name and open Permission section. Click on Edit Bucket Policy and paste the generated policy into that window. Save and you’re done.

You’ll need API keys for use with Paperclip or any other S3 storage engine, so keep them safe.
PS: when you plan to use s3 as storage for your static files, avoid using underscore in your bucket name – as it does not comply with valid FQDN. ‘sample_bucket’ was used only as an example, in the real word you should use ‘sample-bucket’.
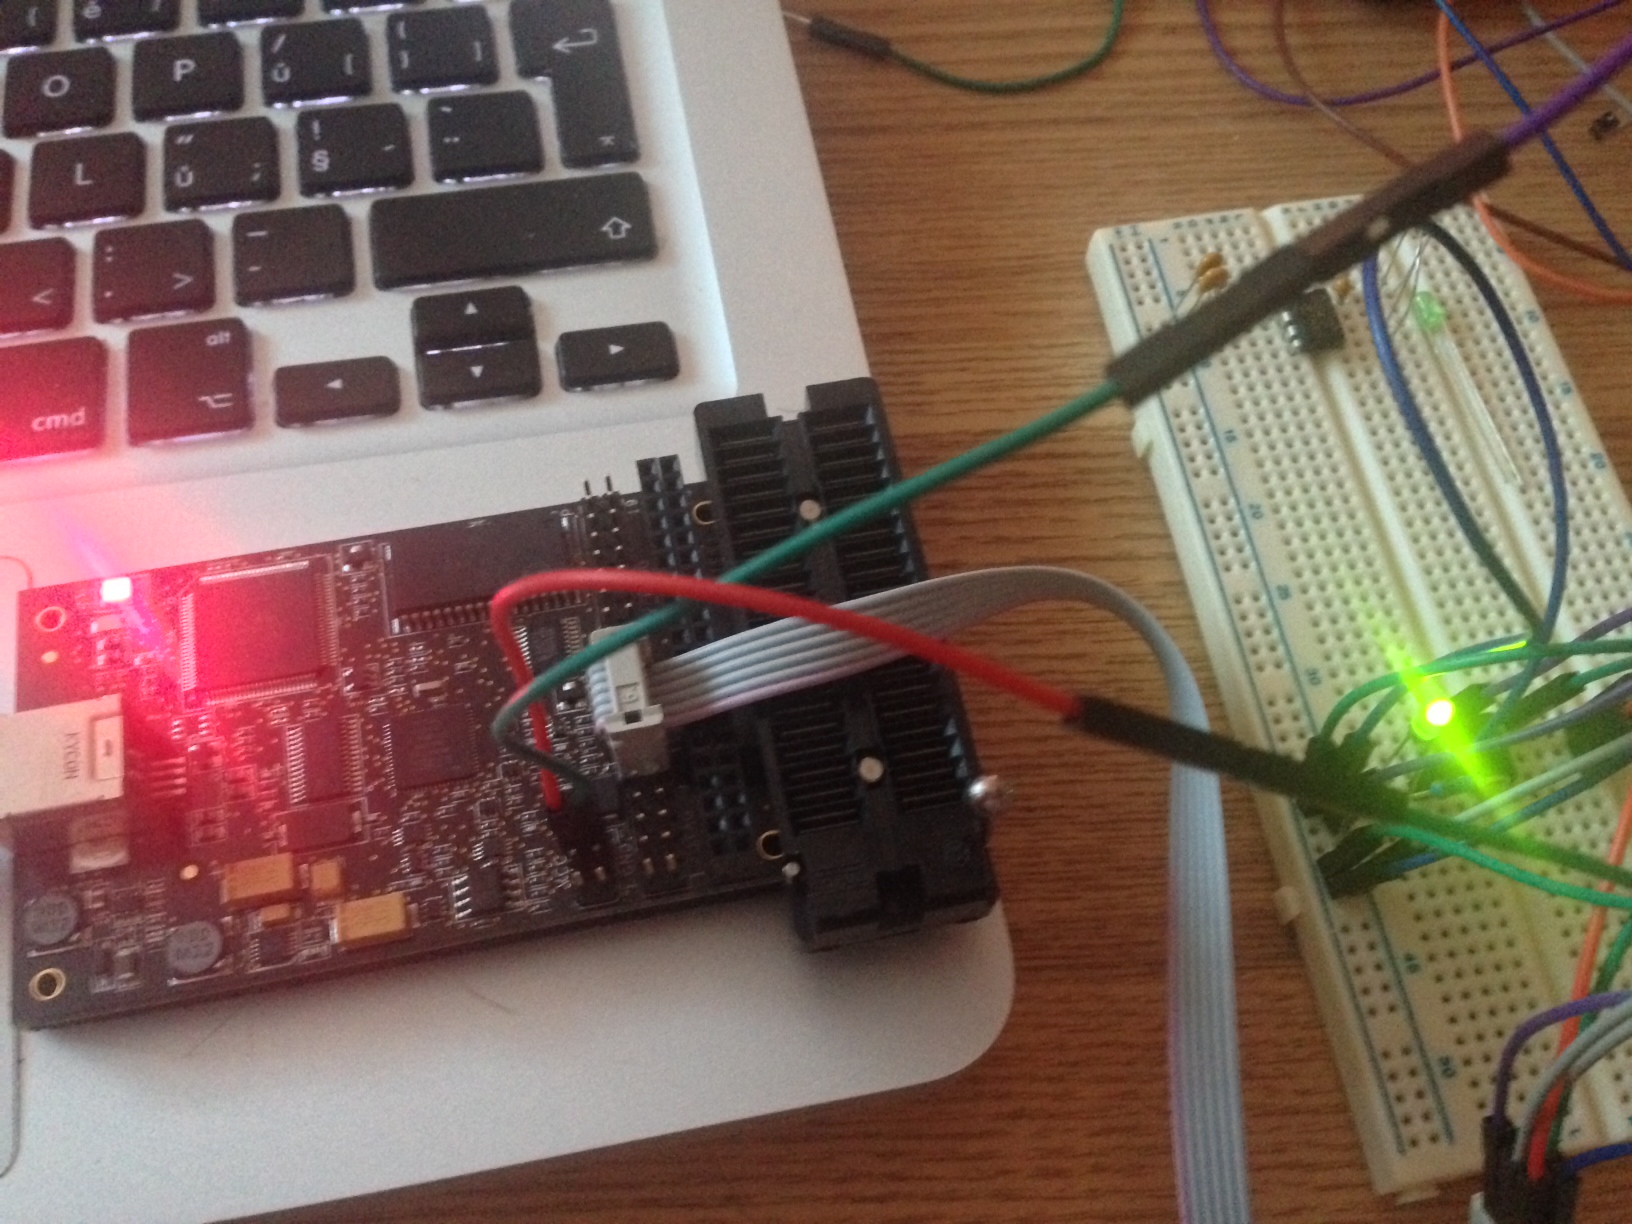
ATtiny13 – Hello World! :)
Finally managed to get into AVR programming. Using OSX, which I found as the worst platform for doing any kind of embed programming :( Sad. Anyway, there’s my first ATtiny schematics and code. I’m using AVR Dragon to flash code into the MCU.
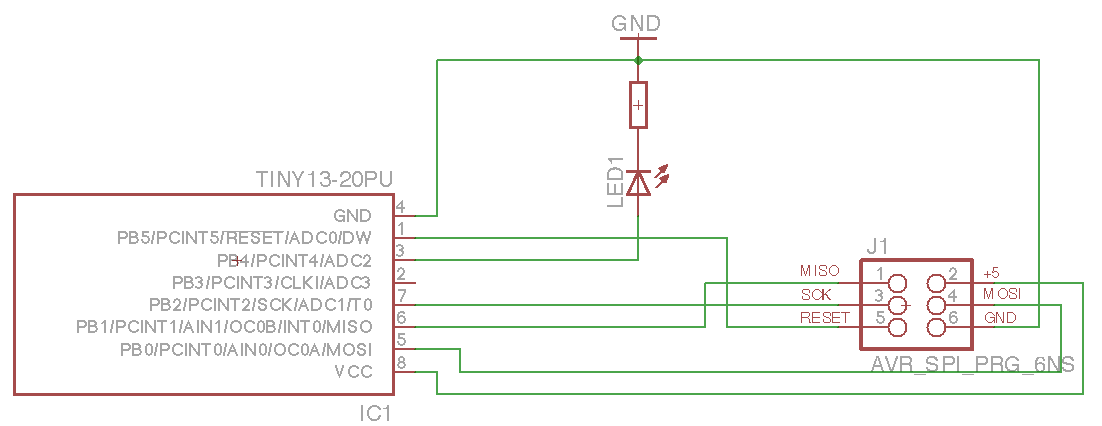
The circuit is quite simple. I just confirm SPI flashing works and I’m able to turn the LED on. So here’s some code (using avr-gcc to compile and avrdure to upload). Create new project using avr-project and add this to main.c file:
#include <avr/io.h>
#include <util/delay.h>

int main(void)
{
    const int msDelay = 50;

    // PortB pin4 to output (set bit to 1 using SHL)
    DDRB = 1<<DDB4;

    // PortB to low
    PORTB = 0;

    while (1) {
        // XOR on pin 4
        PORTB ^= 1<<PB4;
        _delay_ms(msDelay);
    }

    return 0;
}
Now we can compile the firmware and upload to our MCU.
$ make
avr-gcc -Wall -Os -DF_CPU=8000000 -mmcu=attiny13 -c main.c -o main.o
avr-gcc -Wall -Os -DF_CPU=8000000 -mmcu=attiny13 -o main.elf main.o
rm -f main.hex
avr-objcopy -j .text -j .data -O ihex main.elf main.hex
avr-size --format=avr --mcu=attiny13 main.elf
AVR Memory Usage
----------------
Device: attiny13

Program:      72 bytes (7.0% Full)
(.text + .data + .bootloader)

Data:          0 bytes (0.0% Full)
(.data + .bss + .noinit)
No errors. Great. Connect AVR Dragon and upload our new firmware:
$ make flash
avrdude -c dragon_isp -P usb -p attiny13 -U flash:w:main.hex:i

avrdude: AVR device initialized and ready to accept instructions

Reading | ################################################## | 100% 0.15s

avrdude: Device signature = 0x1e9007
avrdude: NOTE: "flash" memory has been specified, an erase cycle will be performed
         To disable this feature, specify the -D option.
avrdude: erasing chip
avrdude: reading input file "main.hex"
avrdude: writing flash (110 bytes):

Writing | ################################################## | 100% 0.46s

avrdude: 110 bytes of flash written
avrdude: verifying flash memory against main.hex:
avrdude: load data flash data from input file main.hex:
avrdude: input file main.hex contains 110 bytes
avrdude: reading on-chip flash data:

Reading | ################################################## | 100% 0.47s

avrdude: verifying ...
avrdude: 110 bytes of flash verified

avrdude: safemode: Fuses OK (H:FF, E:FF, L:6A)

avrdude done.  Thank you.
For those, interested in .hex file – this is how it looks like:
$ cat main.hex
:1000000009C00EC00DC00CC00BC00AC009C008C09A
:1000100007C006C011241FBECFE9CDBF02D012C059
:10002000EFCF80E187BB18BA90E188B3892788BBFE
:100030002FE738E381E0215030408040E1F700C0F5
:080040000000F3CFF894FFCF9C
:00000001FF
and I made some commented assembler output (base is taken from avr-objdump -S main.elf).
 cat main.S

main.elf:     file format elf32-avr


Disassembly of section .text:

00000000 <__vectors>:
   0:	09 c0       	rjmp	.+18     	; 0x14 <__ctors_end>
   2:	0e c0       	rjmp	.+28     	; 0x20 <__bad_interrupt>
   4:	0d c0       	rjmp	.+26     	; 0x20 <__bad_interrupt>
   6:	0c c0       	rjmp	.+24     	; 0x20 <__bad_interrupt>
   8:	0b c0       	rjmp	.+22     	; 0x20 <__bad_interrupt>
   a:	0a c0       	rjmp	.+20     	; 0x20 <__bad_interrupt>
   c:	09 c0       	rjmp	.+18     	; 0x20 <__bad_interrupt>
   e:	08 c0       	rjmp	.+16     	; 0x20 <__bad_interrupt>
  10:	07 c0       	rjmp	.+14     	; 0x20 <__bad_interrupt>
  12:	06 c0       	rjmp	.+12     	; 0x20 <__bad_interrupt>

00000014 <__ctors_end>:             ; set stack to SRAM
  14:	11 24       	eor	r1, r1      ; set 0 to r1
  16:	1f be       	out	0x3f, r1	  ; 0 -> SPH
  18:	cf e9       	ldi	r28, 0x9F	  ; RAMEND
  1a:	cd bf       	out	0x3d, r28	  ; r28 -> SPL
  1c:	02 d0       	rcall	.+4      	; call main loop at 0x22
  1e:	12 c0       	rjmp	.+36     	; then call exit at 0x44

00000020 <__bad_interrupt>:
  20:	ef cf       	rjmp	.-34     	; 0x0 <__vectors>

00000022 <main>:
  22:	80 e1       	ldi	r24, 0x10	  ; 1<<DDB4 (0x10) -> r24
  24:	87 bb       	out	0x17, r24	  ; set r24 -> DDRB
  26:	18 ba       	out	0x18, r1	  ; set r1 (0) -> PORTB
  28:	90 e1       	ldi	r25, 0x10	  ; 1<<DDB4
  2a:	88 b3       	in	r24, 0x18	  ; read PORTB -> r24 to XOR
  2c:	89 27       	eor	r24, r25    ; XOR pin 4
  2e:	88 bb       	out	0x18, r24	  ; set r24 -> PORTB
  30:	2f e7       	ldi	r18, 0x7F	  ; 0x01387f = wait 79999 ticks (50ms at 4MHz)
  32:	38 e3       	ldi	r19, 0x38	  ;
  34:	81 e0       	ldi	r24, 0x01	  ;
  36:	21 50       	subi	r18, 0x01	; decrease r18 by 1
  38:	30 40       	sbci	r19, 0x00	; and decrease other by carry bit
  3a:	80 40       	sbci	r24, 0x00	;
  3c:	e1 f7       	brne	.-8      	; repeat until zero set - jump to 0x36
  3e:	00 c0       	rjmp	.+0      	; relative jump to 0x40
  40:	00 00       	nop             ; do nothing
  42:	f3 cf       	rjmp	.-26     	; jump back to 0x2a (loop)

00000044 <_exit>:
  44:	f8 94       	cli

00000046 <__stop_program>:
  46:	ff cf       	rjmp	.-2      	; 0x46 <__stop_program>